Cute Easy Nail Art Without Tools
These days, merely painting your nails red isn't really enough anymore; there are some brilliantly artistic and creative designs out there to transform your nail painting into real nail art. Of course, it doesn't have to be quite as complicated as it may seem; you don't really need to go out and buy fancy tools or products, you just need some motivation!
We've compiled some of the best nail art hacks so that you can join the trend with ease, regardless of your creativity or perceived skill.
French Mani Touch Up
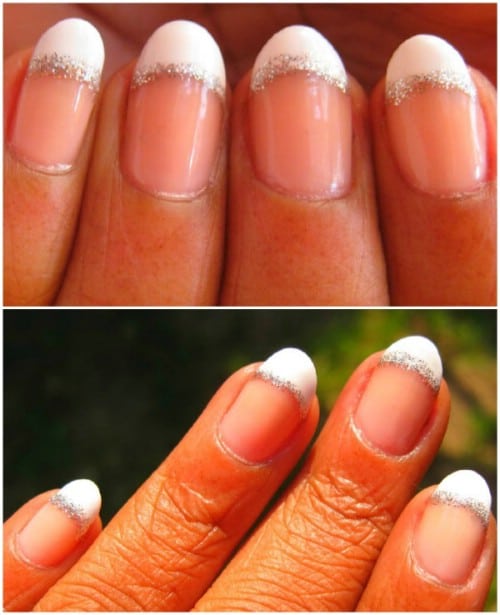
If your French mani still doesn't come out perfectly even the way you want it, there's an easy way to hide you're your mistakes without the frustration of having to start all over again. Get yourself a glitter pen from any stationery or craft shop and draw a line where the white meets the pink.
Lifehack Source and Detailed Instructions – Karine
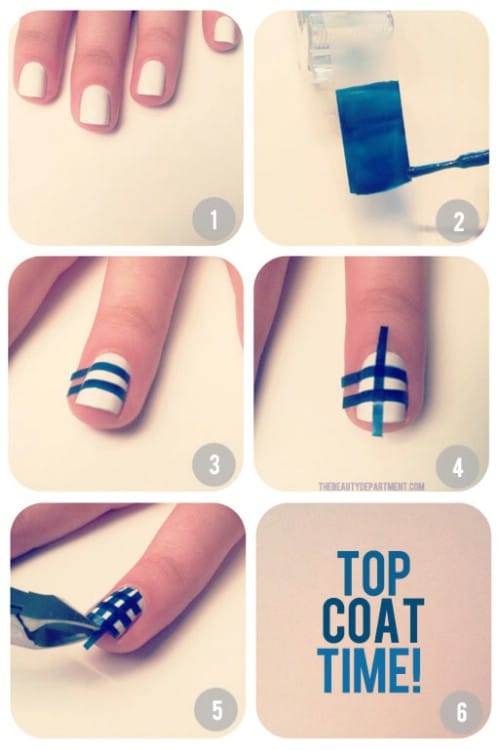
Scotch Tape is Your Friend
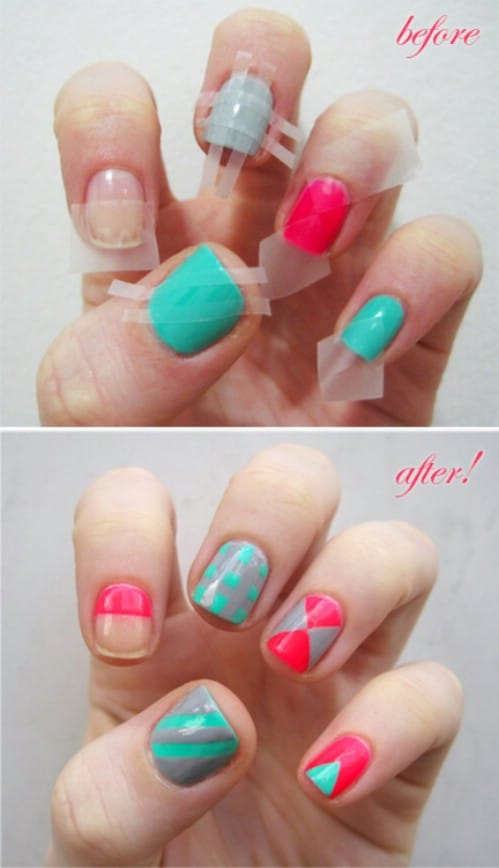
You don't need the steady hand of a tattoo artist to create the perfect zig-zags or stripes; all you need is scotch tape to guide you. Make sure the base color is dried for at least an hour before taping and painting again.
Lifehack Source and Detailed Instructions – Birchbox
Lace Nails
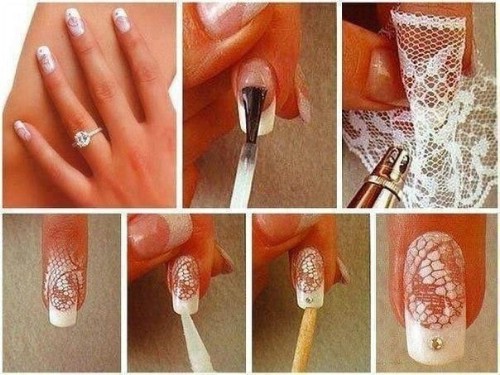
Using the same technique as for the snake skin nails, you can take an old piece of lace, wrap it around your nail, and dab the nail polish on with a makeup sponge. An easy but complicated-looking lace nail design!
Lifehack Source and Detailed Instructions – Pinterest Originals
Love is in the Air
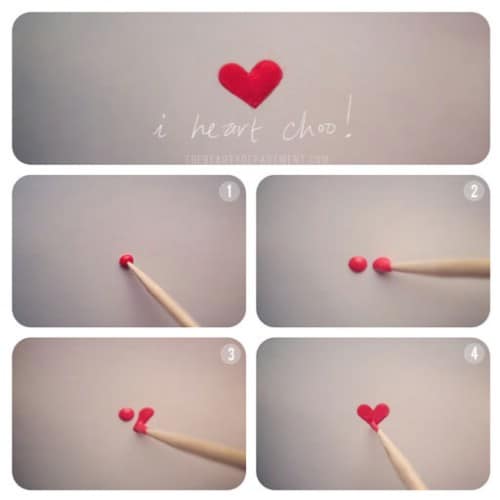
Hearts on nails are adorable, whether you want them all over or simply on one accent nail. All you need to execute the perfect heart is a handy toothpick. Use the toothpick to make two equal-sized dots next to each other, and then drag each of them down at a 45 degree angle to meet at the bottom. Easy as that!
Thin Stripy Nails

For very thin, striped nails, you can use a fan brush. Once your base color has dried, dip the tips of the fan brush's bristles in a different color and brush over your nail horizontally. Wait for it to dry, then carry on with the process using any other colors you wish.
Lifehack Source and Detailed Instructions – SimpleNailArtDesigns
Color Pairings
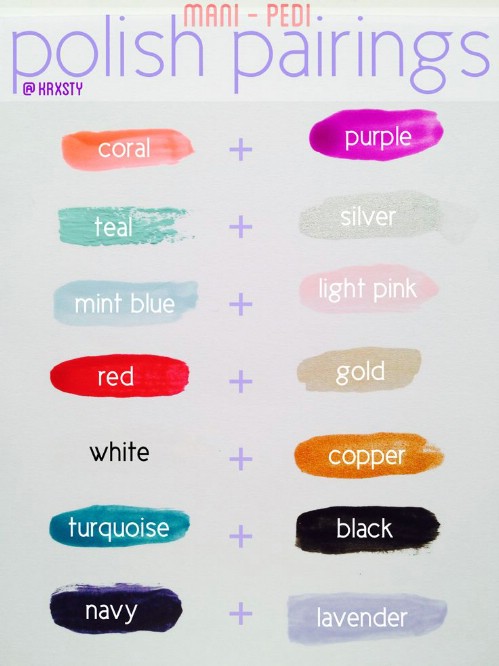
If you want to combine two colors with your fancy nail art, follow this pairing chart to make sure your colors won't clash.
Lifehack Source and Detailed Instructions – Pinterest Originals
Cotton String
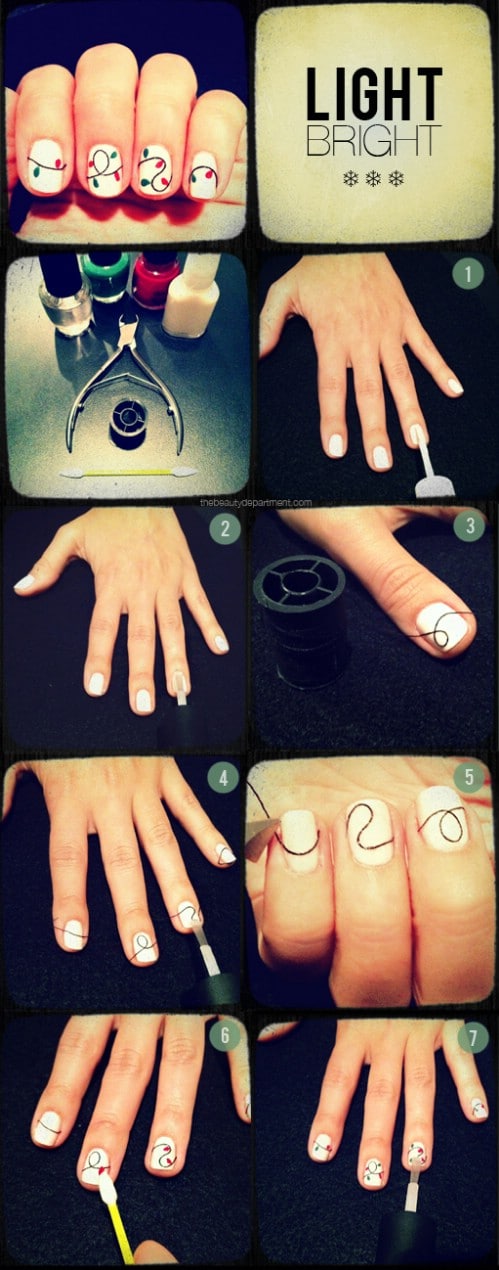
This is a really fun and interesting idea for innovative nail art: paint your base coat and let it dry, then add a clear coat and drape and loop the cotton string so that it sticks to the still wet coat. Once it has dried, top it off with another clear coat so that the string will stay in place. You can finish it with the Christmas lights, but if it's still too early in the year, just leave the squiggly line as is and play around with the base and string colors.
Splattered Nails
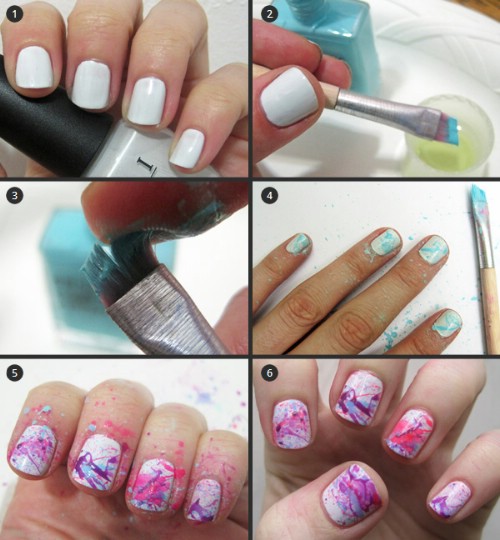
Use a slanted makeup brush to splatter a color (or combination of colors) on your nails for an incredible DIY Jackson Pollock-esque manicure. Simply dip the brush in polish and then in nail polish remover so that it's thin enough to splatter.
Lifehack Source and Detailed Instructions – SheKnows
Splattered Nails Option 2
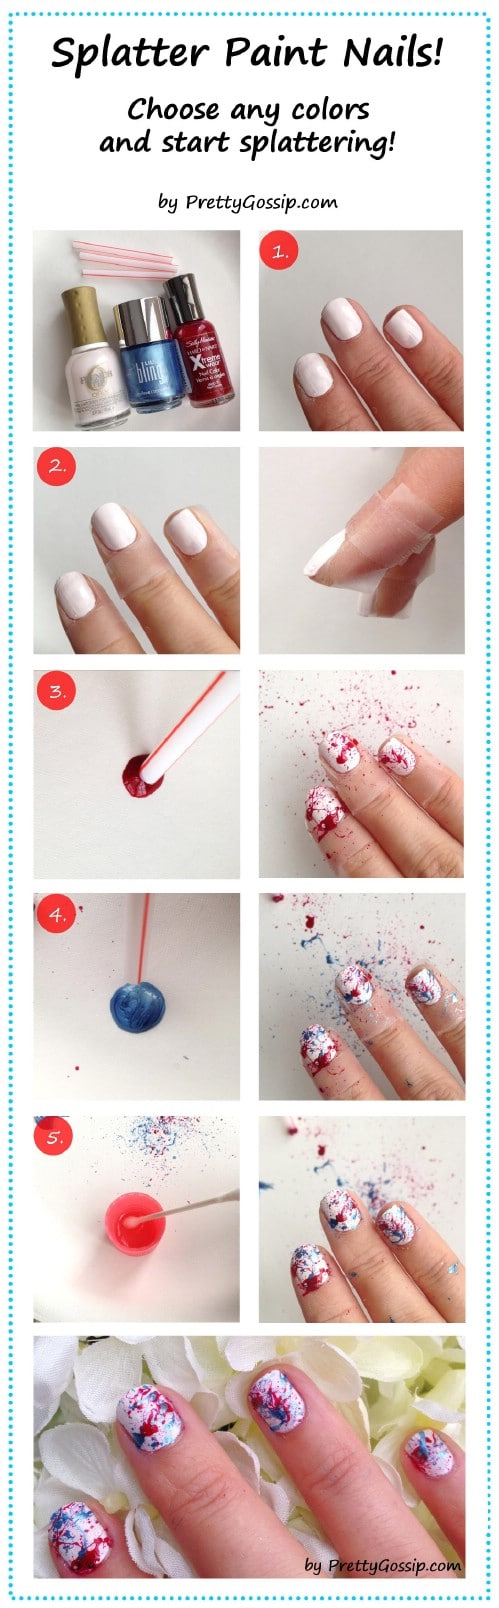
If you don't want to ruin your makeup brush with nail polish or don't have an extra one to spare, you can use a straw instead! Cut the straw in half (shorter means more control), dip the bottom in nail polish, and simply blow it onto your nails for the same effect.
Lifehack Source and Detailed Instructions – PrettyGossip
Shearing Scissors as a Tool
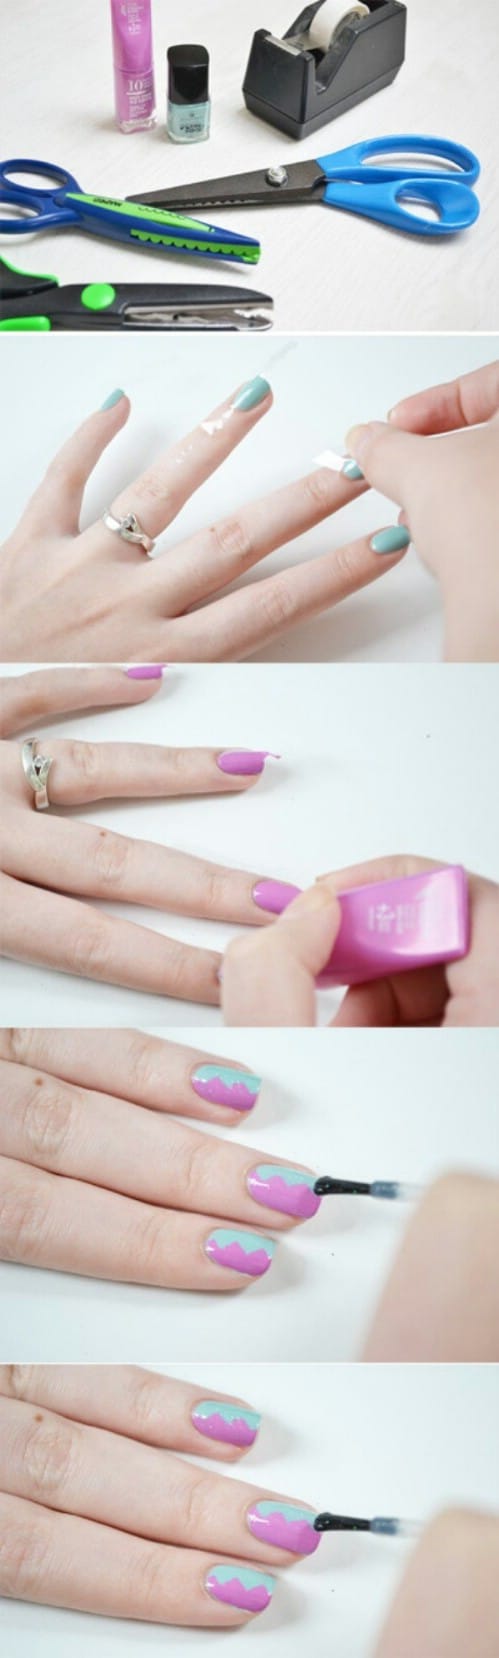
Remember those shearing scissors you loved to use in school? Well it's time to dig them out again. Use these scissors to cut zig-zag shapes with your scotch tape so that you can use them for the perfect zig-zag or scalloped pattern.
Lifehack Source and Detailed Instructions – ChloesNails and Byaranka
Gorgeous Gingham
Scotch tape isn't only used as a guide for straight lines; you can actually stick it on your nails for an instant pattern. Paint the tape with nail polish, cut it into strips once dried, stick on nails, and there you go; nail art that won't chip off quite so easily! Once you cut off the excess, finish with a top coat to seal it off.
When Life Gives You Lemons…
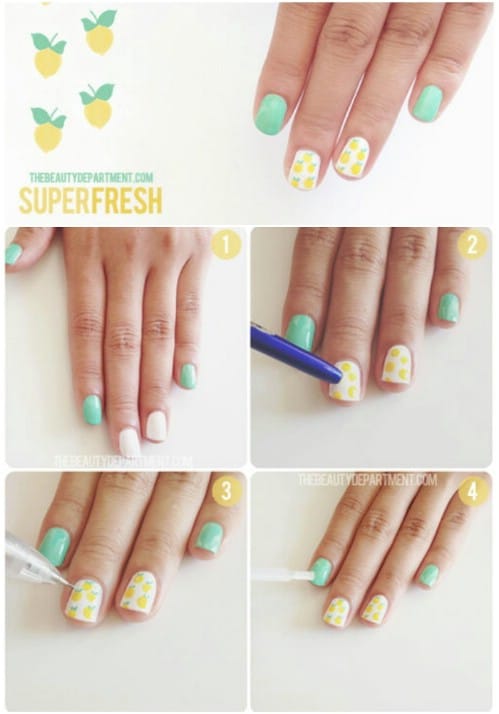
Lemons go well with tequila, but lemon nails are even better. This nail masterpiece is a lot easier to do than it looks: use the back of a paintbrush for the round lemons and then dip a mechanical pencil in green polish to draw on the two leaves – this is what makes it look more fruity and less like yellow polka dots.
My Feathered Friend
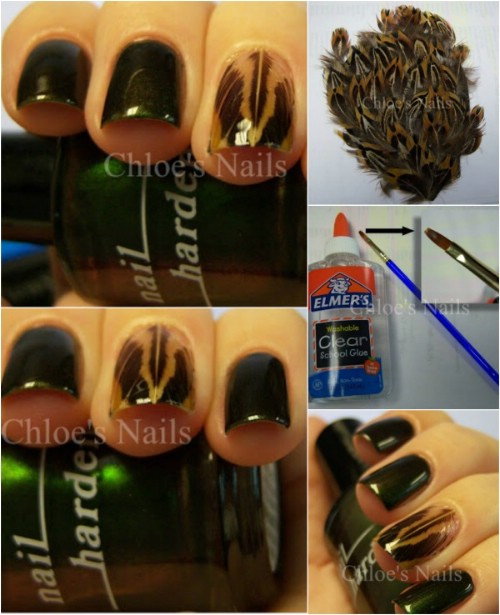
Painting a free-hand feather on a nail is a near-impossible task, so we've got the perfect cheat: real feathers and Elmer's School Glue (or nail glue). Cut the actual feather to where it looks like it will fit your nail (rather too big than too small). Next, paint your nail with the clear glue, put the feather in place, and then paint over it all with another layer of glue. You can use cuticle scissors to trim off any parts of the feather that stick out.
Lifehack Source and Detailed Instructions – ChloesNails
Draw, don't Paint
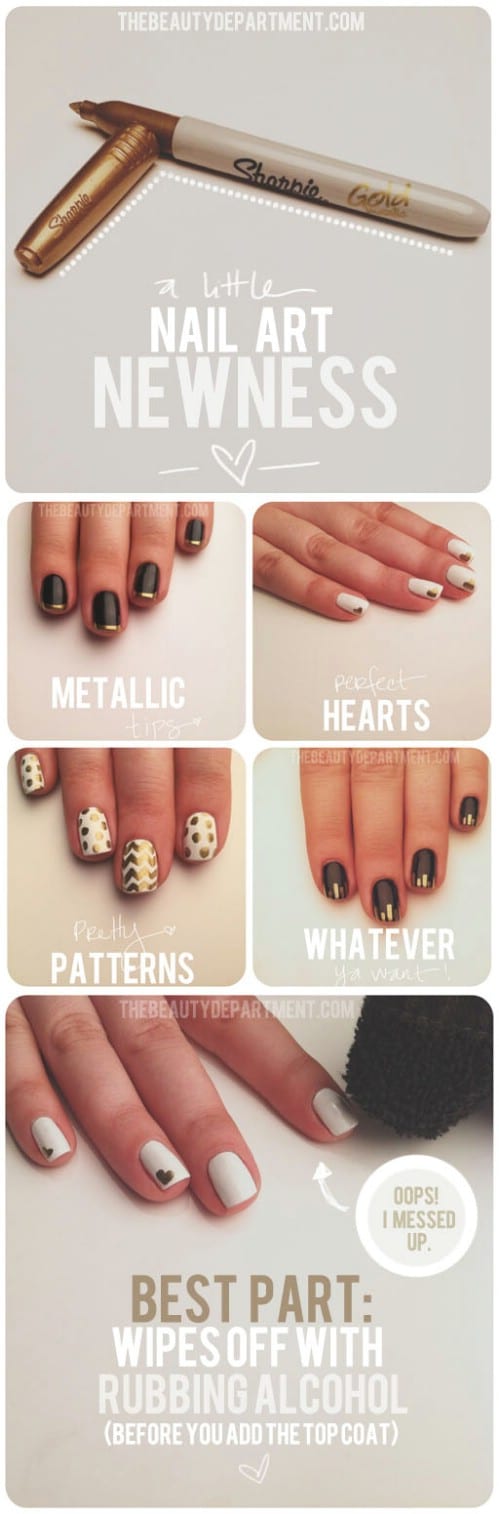
While you can get some awesome nail art tools to make the drawing a bit easier, you can actually bypass all the fuss by using a good old sharpie! As long as you finish it off with a good top coat, the picture or pattern will stay put.
DIY Stickers
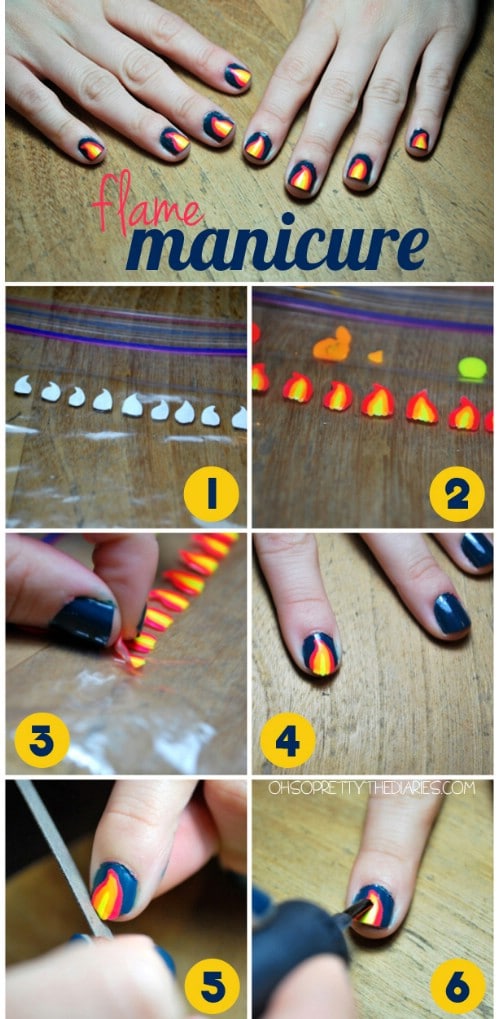
Some may find drawing or painting designs or shapes on their nails too finicky and difficult, but these genius hacks makes it so much easier! Paint the design on a Ziploc bag and let it dry for a few minutes so that you can peel it right off. From there, you can stick it on your nail like a sticker, clean it up, and secure it with a top coat. The possibilities are endless!
Lifehack Source and Detailed Instructions – HeyWanderer
DIY Stencils
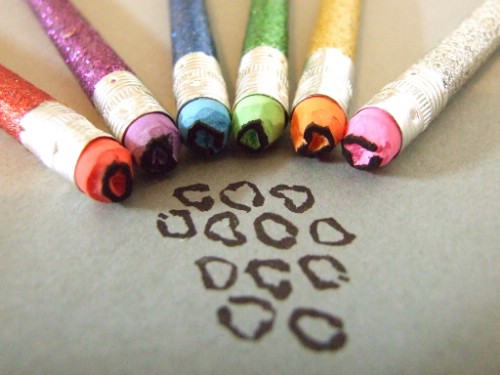
Create your own leopard print stamps by carving out the shape out of pencil erasers. Depending on your creativity and skill, there is a whole host of shapes that you can make to make your nail painting a lot easier.
Lifehack Source and Detailed Instructions – Flickr
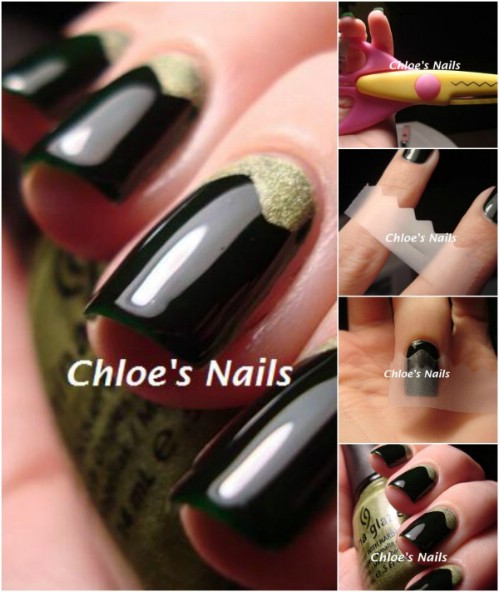
For the Less Obvious
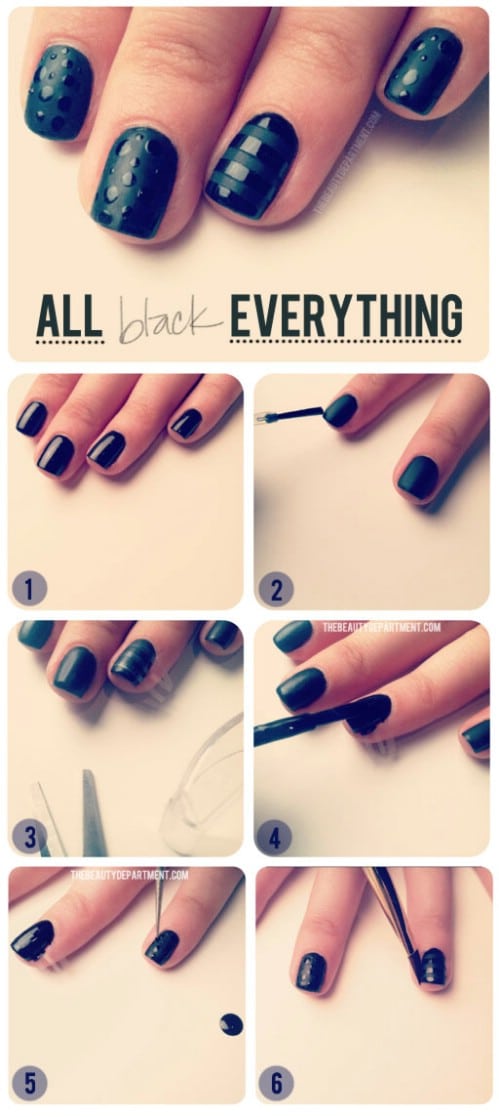
If you're keen to introduce some nail art into your life but don't really like the idea of bright color bursts, then the subtlety of mixing matte and gloss could be to your liking. You can start with a matte black polish, or if you don't have that, paint a matte top coat over the glossy black. Add some designs or patterns with the glossy polish for an understated but still noticeable manicure.
Easy Small Polka Dots
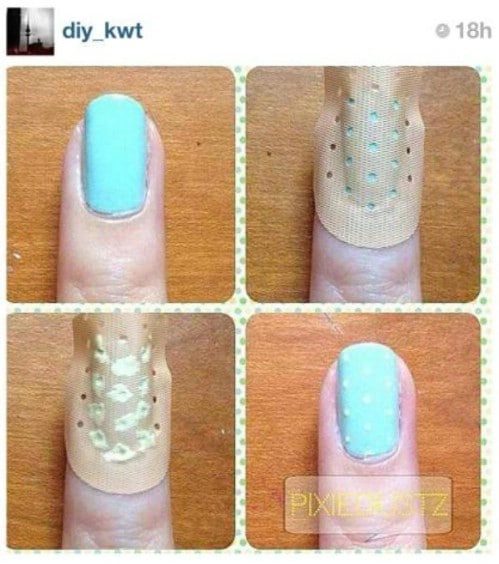
Band aids have little holes in them to allow your skin to breathe, but in this case, we're using them as stencils! Stick the holed part of the band aid on your nail, paint over it, and then peel it off after it has dried to reveal perfect mini polka dots.
Lifehack Source and Detailed Instructions – Diyncrafts
Easy Large Polka Dots
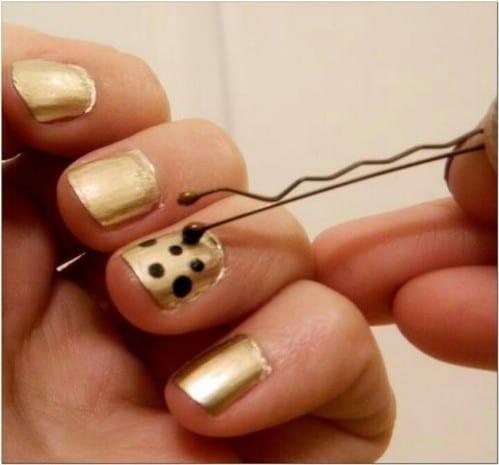
Simply dip the ball end of a bobby pin in nail polish and use that as a dotting tool for your nails. Don't forget to seal it off with a top coat so that your creation lasts longer.
Lifehack Source and Detailed Instructions – Pinterest
Vibrant Neons
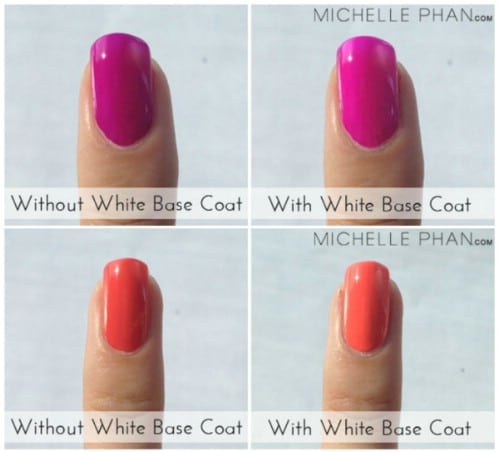
Neon nails really are fun and can certainly transform any outfit. In order to get your bright, neon colors to really pop, start off with a white base coat and then paint the neon over it – it makes all the difference.
Lifehack Source and Detailed Instructions – MichellePhan
Shaping Cheat
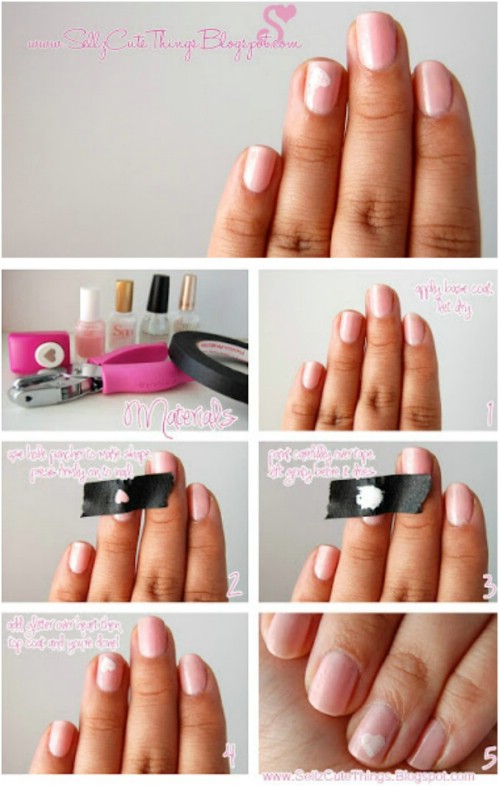
If you don't feel comfortable with the toothpick heart technique, there's an even easier way to get that perfect shape. Heart hole punchers aren't actually that difficult to find; punch the hole on a piece of masking tape, stick it onto your nail, and paint the heart using the tape as a stencil. You can do this with any shape d hole puncher you can find.
Lifehack Source and Detailed Instructions – SellzCuteThings
Snake Skin Nails
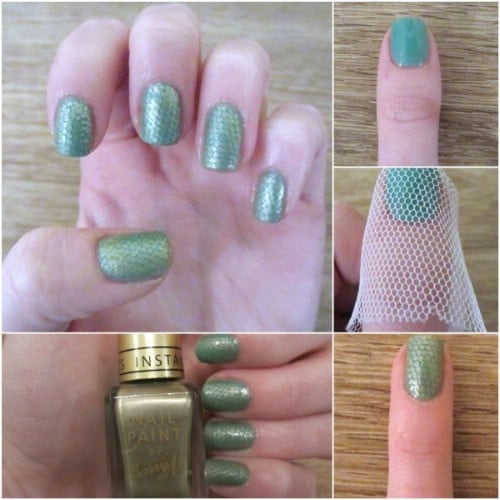
You'll need some netting material for this one; you can find this at a material shop or even use a small piece from your loofah (puff sponge). Wrap the netting tightly over your nail and use a makeup sponge to dab your second color over the netting (don't try painting over the netting; it will smear and smudge). A glittery nail polish works best for the snake look.
Lifehack Source and Detailed Instructions – ConfessionsAndCreations
Makeup Sponge Ombre
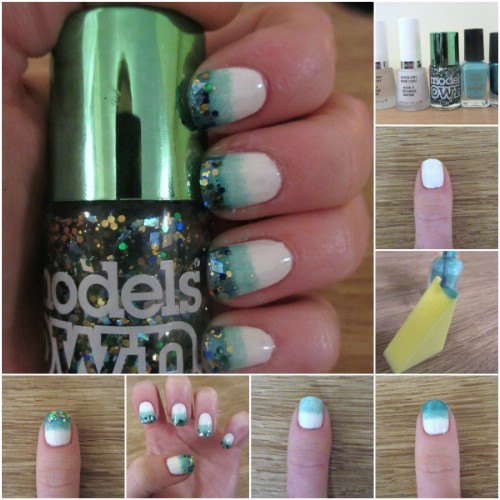
Your makeup sponge can be used in another way to create a trendy ombre look. Paint the nail varnish on to the bush and dab it on the top part of your nail. Once that has dried, apply a darker shade to the sponge and dab it a bit higher up for your beautiful ombre nails.
Lifehack Source and Detailed Instructions – ConfessionsAndCreations
Turquoise Stone
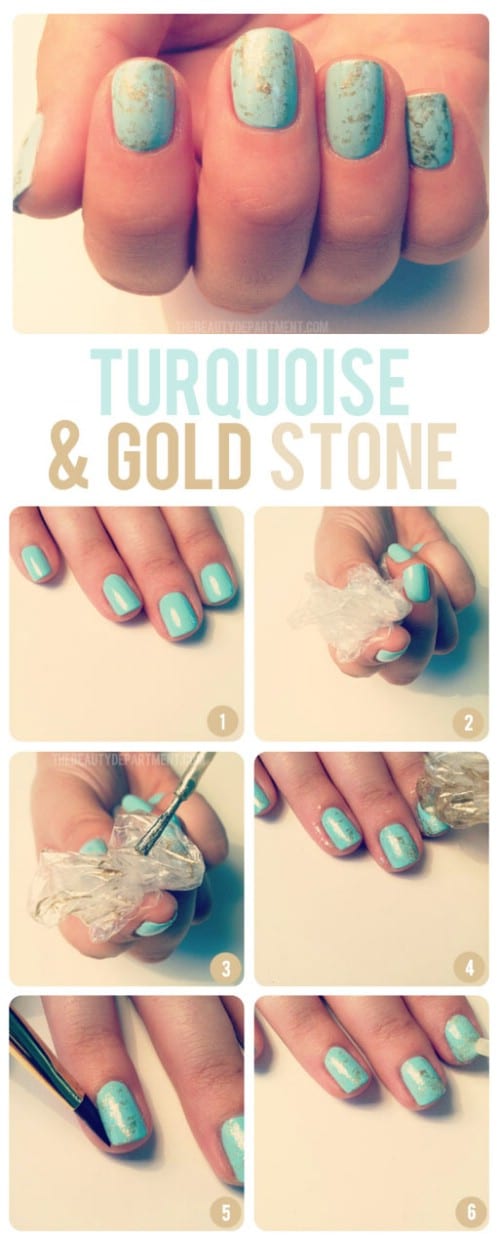
To recreate a turquoise and gold stone effect on your nails, the only other tool you need is some plastic – a Ziploc bag or wrapper will do just fine. After the base turquoise has dried, scrunch up the plastic, apply the god polish to it, dab it on a piece of paper to get rid of the excess, then dab it on each nail like a stamp. Of course, you can use any color combinations with this technique.
Half Moon Manicure
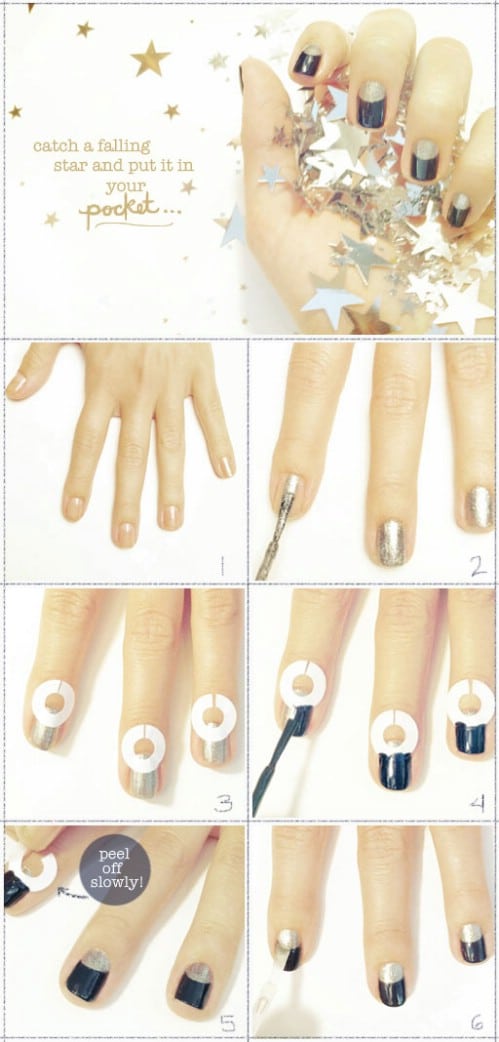
The half moon manicure is a fun twist on the classic French manicure. It's time to pop down to your nearest office supply store to get your hands on some ring reinforcement stickers – the kind that's used to repair ripped holes in ring binder paper. After applying your base color, put the stickers at the base of your nail to create the half moon shape; paint the tops of your nails and peel off the stickers.
French Manicure
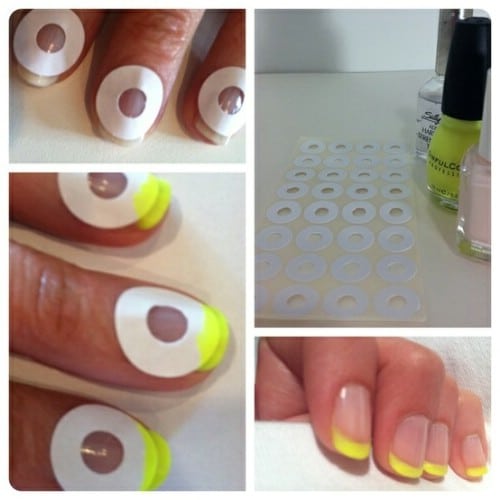
Now that you have ring reinforcement stickers, you can also use them for the original French manicure. Place the stickers higher up on your nails where you want the line to start and paint away! This works better than tape since you'll get a rounded line instead of a dead straight one.
Lifehack Source and Detailed Instructions – AllWomenStalk
Velvet Luxury
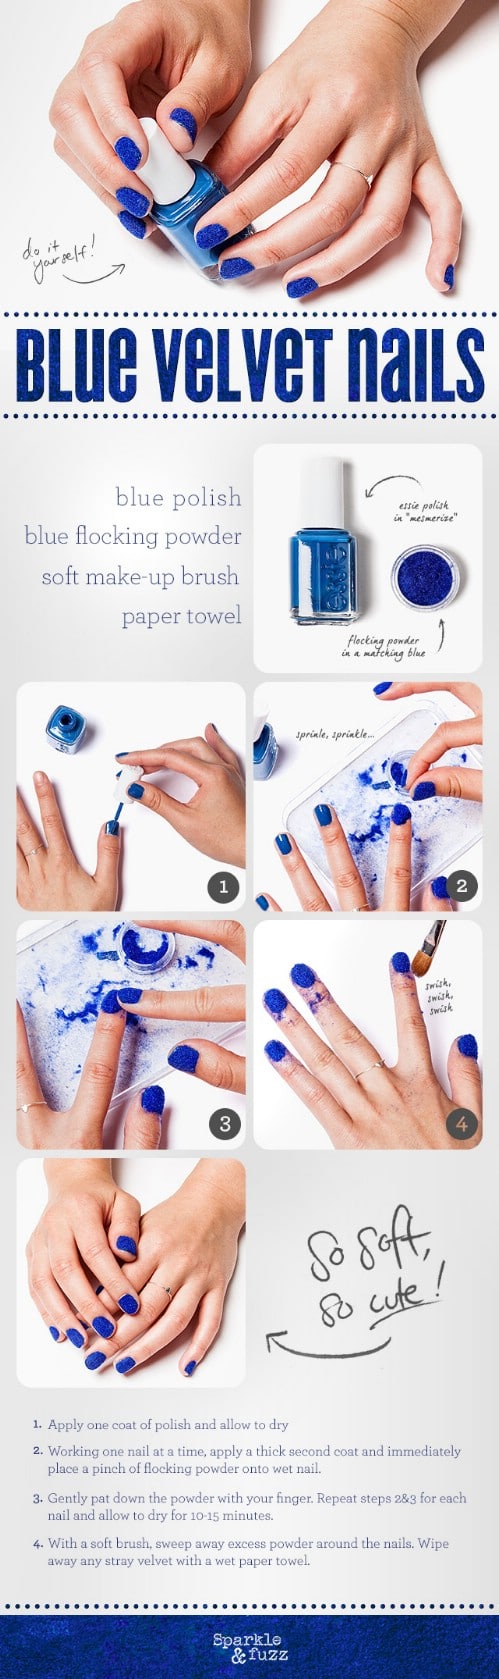
Nail art isn't only about patterns and shapes, you can also incorporate some texture to add a whole new dimension. If you want a velvet look and feel, all you'll need is flocking powder (you should be able to find this at a craft shop). Paint your nails in the same color as the powder, sprinkle the powder, let it dry, then brush away any excess powder. Instant royalty!
Lifehack Source and Detailed Instructions – Scarves.com
DIY Matte – Eye Shadow

Don't have matte nail polish at hand and no time to run to the store before your night out? Good news: you can actually make your own! All you need to do is combine your top coat varnish with some crushed eye shadow, mix well, and then apply to your nails.
Lifehack Source and Detailed Instructions – Makeup
DIY Matte – Corn Starch
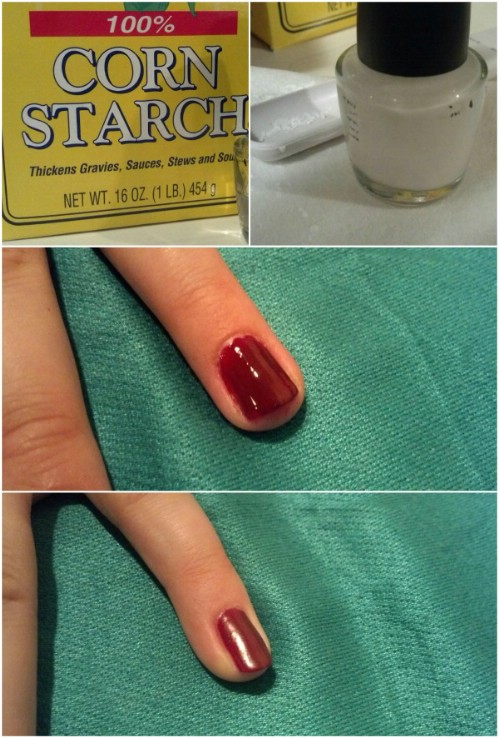
If you don't have the right color eye shadow you can use corn starch instead. Add it to a clear nail polish, little by little, and shake it to mix well; you'll know it's ready when it is white in color. Now you can paint this over your glossy polish for a matte finish!
Lifehack Source and Detailed Instructions – AnOnionExposed
Easy Peel-Off Glitter
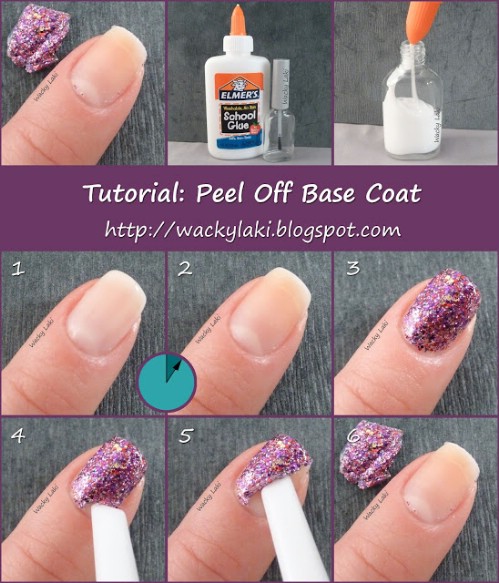
Glitter nail polish can look really glamorous and fun, but getting it off is a downright pain. Thankfully, someone has discovered that painting your nails with Elmer's School Glue as a base for the glitter nail polish, means that you can peel it off when you're done. You can also use different brands of craft/school glue, just make sure that it is clear, non-toxic and washable.
Lifehack Source and Detailed Instructions – WackyLaki
Watercolor Art
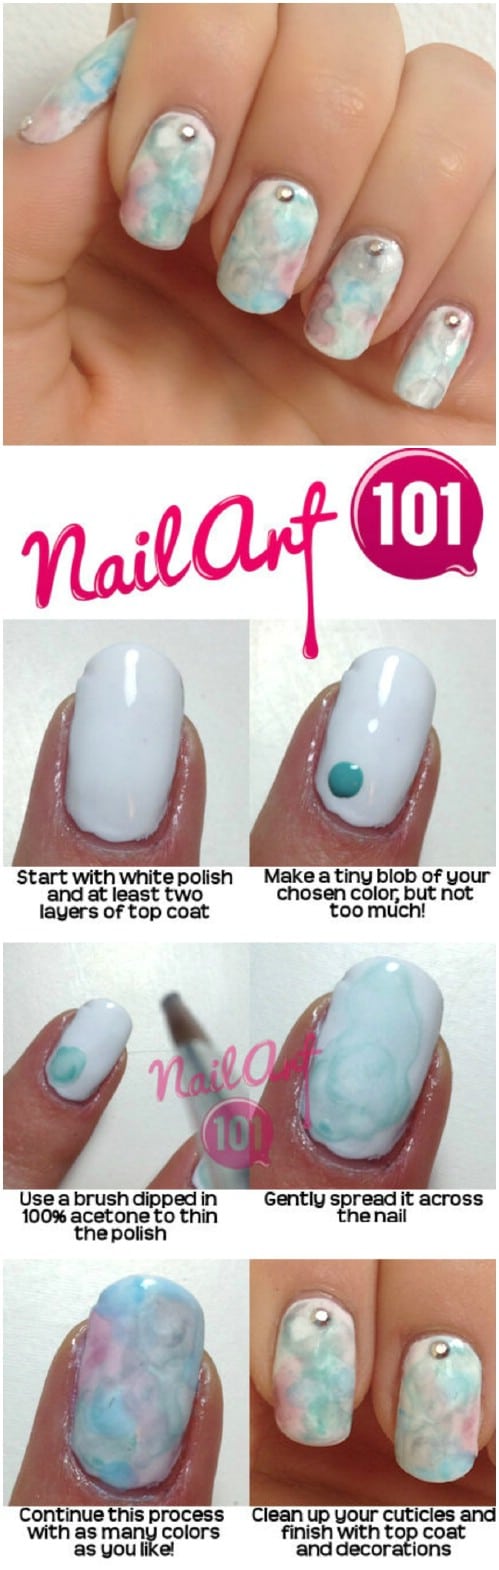
When you think of watercolor paintings you think of soft, beautiful colors; how great would this look on your nails? After a base of white nail varnish and two top coat layers (very important!), make a small dot on your nail. Next, dip a brush in nail varnish remover and spread that dot around your nail – this thins it out to create the watercolor effect. Add as many colors as you like!
Lifehack Source and Detailed Instructions – NailArt101
Water Marbling
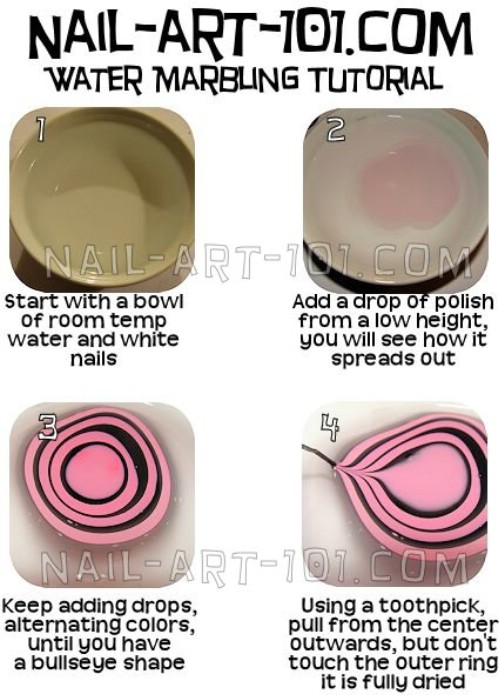
This manicure is sure to get you a lot of compliments because it looks that good! Drop your nail polish into a cup of room temperature water; alternate drops between colors so that it creates rings in the water. Then use a toothpick to create a design you want (this makes for some fun experimenting), and when you're happy, dip in your white-painted nail.
Lifehack Source and Detailed Instructions – NailArt101
Vaseline Clean-Up
When you're using messy techniques such as water marbling or splattering, instead of having to wrap up your finger with tape, you can just rub Vaseline or petroleum jelly onto the skin around your nail. This will allow you to simply wipe off the excess polish left on your skin.
Lifehack Source and Detailed Instructions – CharisaDarling
Rubber Band French Manicure
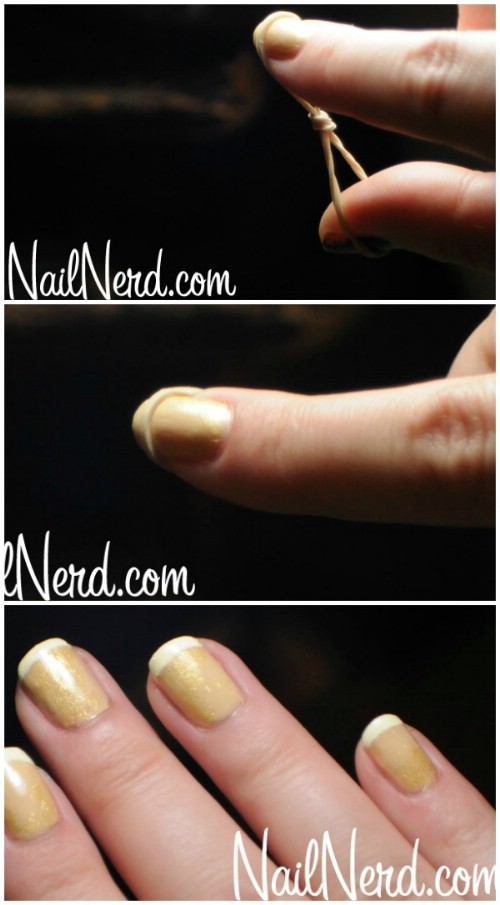
Painting that pretty white tip for a French manicure does not necessarily come naturally to all of us, so here's a great hack: knot a small rubber band in half and put one loop over your nail where you want the tip line to be, and the other over your thumb to keep it in place. There you have your guide!
Lifehack Source and Detailed Instructions – NailNerd
Rhinestone Application
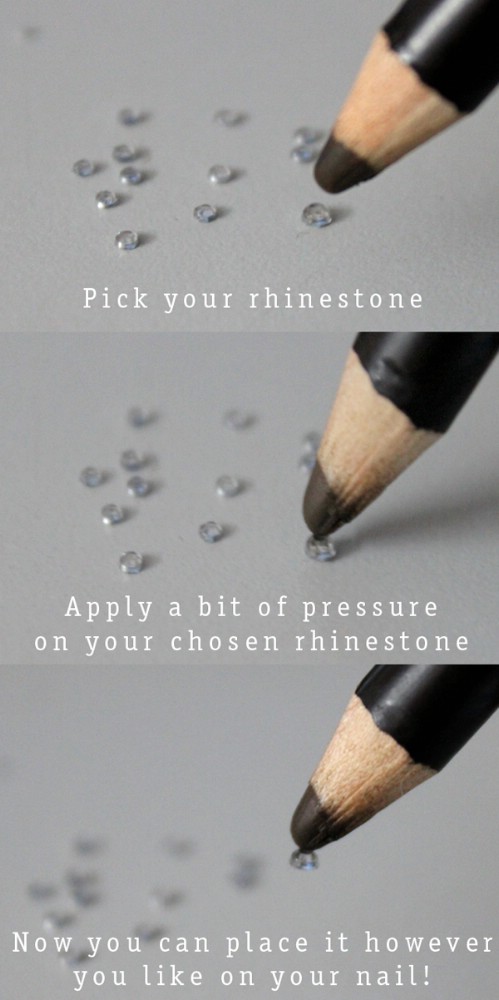
A little bit of sparkle never hurt anyone! Applying those rhinestones to your nails can be quite a fiddly business and your fingers can easily mess up your wet nails. Use an eyeliner pencil to pick up the rhinestones and stick them to your nails without the fuss.
Lifehack Source and Detailed Instructions – AllWomenStalk
Newspaper Nails
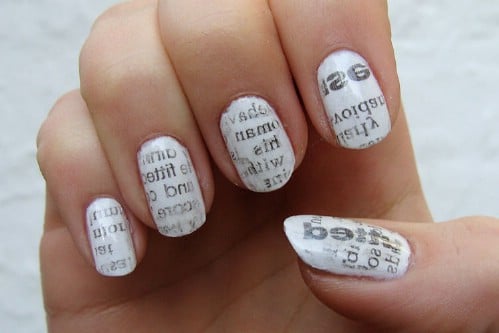
This is one is super easy and quick! Paint your white base coat, dip your nail in alcohol for just a few seconds, put the newspaper on your nail and rub it without moving, then peel away. The alcohol perfectly transfers the text to nail – you can use rubbing alcohol or even vodka.
Lifehack Source and Detailed Instructions – NailArt101
Quick-Dry Nails – Water

If you really don't have the time to wait for your nails to dry, simply soak them in a bowl of ice water for a few minutes.
Lifehack Source and Detailed Instructions – Diyncrafts
Quick-Dry Nails – Spray

Another quick-dry method is to pray your wet nails with non-stick cooking spray; make sure you spray evenly and don't hold the can too close to your nails.
Lifehack Source and Detailed Instructions – Diyncrafts
Nail Polish Remover Jar
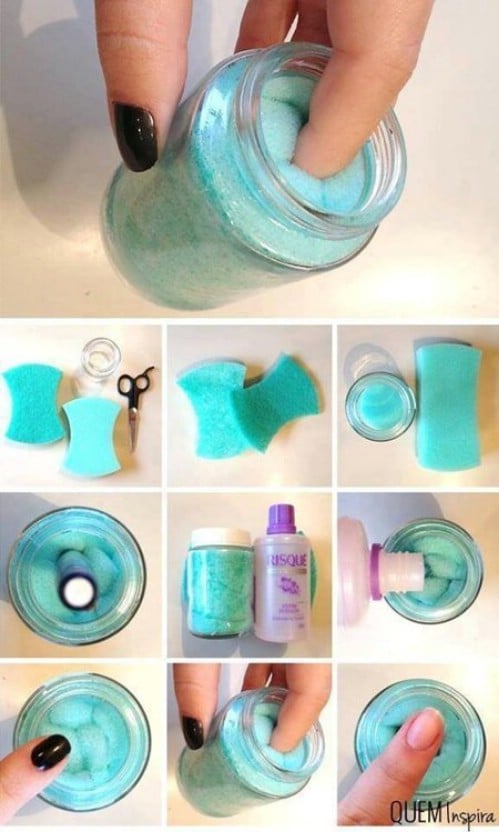
Cleaning your nail polish off can be quite an annoying task with all the cotton swabs needed, so here is an innovative way to get that color off. Shove a sponge into a small jar and pour the nail polish remover in so that the sponge absorbs it. Next time you have to clean your nails, you can simply stick them in the jar.
Lifehack Source and Detailed Instructions – BellaShoot
Toothpaste Stain Removal
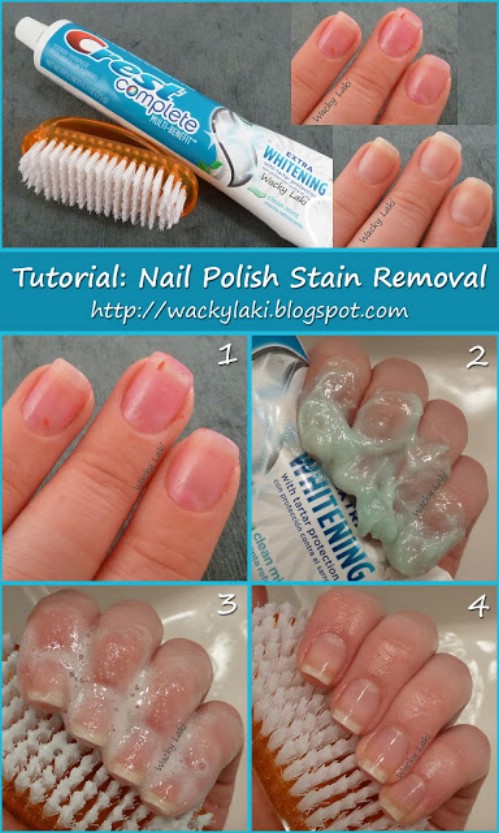
Certain nail polishes can really stain your nails in a way that cannot be cleaned by acetone. An easy way to combat this is to massage whitening toothpaste onto your nails, scrub them and rinse off (repeat if necessary).
Lifehack Source and Detailed Instructions – WackyLaki
Cute Easy Nail Art Without Tools
Source: https://www.diyncrafts.com/8776/beauty/40-diy-nail-art-hacks-borderline-genius